I recently needed to convert a tile map consisting of squares and triangles into chunks of geometry and after trying a couple of different approaches, I eventually settled on one which seems to work. I didn’t come across it anywhere else, so I thought I’d post it here in case anyone else is wanting to do something similar.
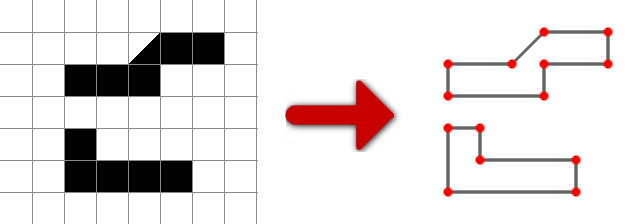
So, the problem is: Given a regular tile map, where each tile is either a square or a triangle taking up half of the square, generate sets of vertices which describe each ‘chunk’ of geometry in the map. E.g.:

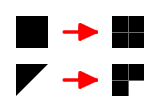
The first method I tried was adapting this method, by representing each tile in a 2×2 way, like so:

Then performing the contour tracing algorithm in the link above, and removing every other point in the resulting list of points. At first it looked like this worked, but there were a couple of cases where a triangle was placed next to another triangle where the algorithm failed. 🙁
After thinking about it for a while, I came up with this method, which I’m pretty sure works, but if anyone can see any errors with it, please do let me know. I’ll give you the algorithm, then go through it in detail. The algorithm goes as follows:
Pick a start tile
    Add the start tile to the open list
    Remove the tile from the tile map
    Add each of the tile's vertices to the vertex list
    Add each of the tile's edges to the edge list
    While the open list is not empty
        CurrentTile = Tile at the end of the open list
        NextTile = Tile in the "forward" direction of the current tile
        If NextTile exists and shares a common edge with the current shape
            Add NextTile to the open list
            Remove NextTile from the tile map
            Add NextTile's vertices to the vertex list (without creating duplicates)
            Generate an edge list for NextTile
            Remove edges that overlap from the main edge list and the edge list for NextTile
            Add the remaining edges from NextTile to the main edge list
        Else
            Move on to the next "forward" direction for CurrentTile
            If "forward" direction for CurrentTile = initial "forward" direction
                Remove CurrentTile from the open list
Traverse the edge list and add the vertices that are used to the vertex list for your shape |
So, what does that all mean? Well, lets go through it step by step:
Add the start tile to the open list
The easiest way to search for a start tile is to do a row by row search. Start at 0,0 and scan along the first row, then the second and so on until you find an occupied tile. This is your start tile. The open list is a list of tiles currently being looked at. The start tile will be the first tile in this list.
Remove the tile from the tile map
Removing the tile from the tile map means that the algorithm will no longer visit them. Obviously, if you need your tile map after running the algorithm, create a copy of it 🙂
Add each of the tile’s vertices to the vertex list
The vertex list stores each corner point that has been used by each tile. For the first tile, just add the world space corner points to the list.
Add each of the tile’s edges to the edge list
The edge list is an list of, you guessed it, edges! Each edge is a pair of indices into the vertex list. Note that edges should always be specified in the same winding order and should always start at the same corner. I.e. pick clockwise or counter-clockwise and use that for both the square and triangle tiles, like so:
Notice on the last triangle that we started at the top left (as there is no vertex in the bottom left, and this would be the next one round in our clockwise winding order).
While the open list is not empty
I.e. While we’re still examining tiles for our current shape.
CurrentTile = Tile at the end of the open list
Set the current tile to the last tile added to the open list
NextTile = Tile in the “forward” direction of the current tile
Each tile in the open list maintains the direction of the neighbour that it is currently examining. Each time a tile is added to the open list, its “forward” direction (i.e. the direction in which to examine) is set to “up”. I just use an integer here, with the range 0 – 3, representing up, right, down and left, in that order. When we’re on a tile, we examine the neighbour in the tile’s “forward” direction, and pursue that path as far as possible. The next time the algorithm comes back to a tile, it rotates to the next “forward” direction and tries that path, until all four directions have been exhausted.
If NextTile exists and shares a common edge with the current shape
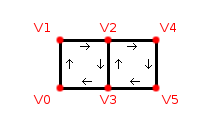
If there is a neighbour in our current tile’s “forward” direction, then we check to see if the neighbour and the current tile share common edges. One way to do this is to generate a list of edges for NextTile using the current vertex list. Any edges which contain vertices in the current vertex list will use the same vertex indices as the existing edges, but in reverse order (due to each tile having the same winding order), like so:
In the above image, the shared edge is V2 -> V3 for the left tile, and V3 -> V2 for the right tile.
Add NextTile to the open list
Add NextTile to the end of the open list, initialising its “forward” direction to 0 (up)
Remove NextTile from the tile map
Remove NextTile from the tile map so it is not revisited by the algorithm (except for when it is returned to by the open list).
Add NextTile’s vertices to the vertex list (without creating duplicates)
Add each world space vertex for the tile to the vertex list, but don’t create duplicates for vertices that are already in the vertex list.
Generate an edge list for NextTile
Generate a list of edges (remember, each edge is a pair of indices into the vertex list), using vertices from the vertex list.
Remove edges that overlap from the main edge list and the edge list for NextTile
Remove any edges that overlap from both the edge list that was just generated for NextTile, and the main edge list. Remember, neighbouring tiles with overlapping edges will specify the indices of the overlapping edge in opposite order from each other. I.e. If a tile has an edge V2 -> V3, and the neighbouring tile has an edge that shares these vertices, the neighbouring tile’s edge will be V3 -> V2. This is due to the winding order, as shown above.
Add the remaining edges from NextTile to the main edge list
Any edges that do not overlap can now be added to the main edge list
Move on to the next “forward” direction for CurrentTile
When you reach here, it means there are no tiles to check in the current direction, so we should rotate to look in the next direction. If you’re storing your “forward” direction as an integer, simply increment it.
If “forward” direction for CurrentTile = initial “forward” direction
This is a check to see if we’ve exhausted each of the four directions. The initial “forward” direction will be 4 if you’re representing directions as an integer in the range 0 – 3. If the “forward” direction reaches 4, it means we have tested each direction (0 – 3) and we are done with this tile.
Remove CurrentTile from the open list
As we are done with this tile, we can remove it from the open list.
So, after we’ve generated our edge list, we now need to traverse it. Simply start at the first edge and follow the trial of edges around the shape until you reach the start vertex again. E.g.: First edge: V0 -> V1, so add V0 and V1 to your shape, then search for an edge that starts at V1. Next edge: V1 -> V4, so add V4 to your shape and search for an edge that starts at V4, and so on, until you reach V0 again. You’ve now got a list of vertices that represent your shape.
After this, two possible further steps are to optimize your final list of vertices (i.e. remove co-linear ones, so you are only left with the corner vertices), and remove any tiles which are inside your shape (unless you want to create shapes within shapes). Note, that the final step will only produce the outline shape of an object, so will not handle holes in closed objects. You may be able to handle holes in closed objects by recursively performing the last step and removing edges from the final edge list as you visit them, until the list is empty. This should give you multiple shapes, the first being the outer shape and the rest being the holes inside the shape, but I haven’t really looked in to this that much, so it may not work 🙂
Here’s a little animation of the algorithm. The grey edges are overlapping ones that have been removed.


4 replies on “Converting a tile map into geometry”
Thanks for the informative post. As a big fan of geometry I’m always amazed from the magic of Geometry. Thumbs up!
[…] up a Walk Through or Fly Through animation by setting up walls, camera and path in Autodesk 3dsmax.GoGo-Robot GamesAdd NextTile's vertices to the vertex list (without creating duplicates) … You've now got a list […]
Wow, this is brilliant—now I have a way to convert tile maps to Chipmunk geometry. 🙂 Needs a little work to simplify longer edges into single segments, but otherwise it’s golden.
Thanks. Sorry it took so long to approve your post. I didn’t see it through the waves of spam comments we get here 🙂
As for simplifying the longer edges, it’s simply a case of testing the dot product of the line Vn -> Vn+1 with the line Vn -> Vn+2 (remembering to normalise them first). If they are the same, then the three vertices (Vn, Vn + 1, Vn + 2) are co-linear, and so you can remove Vn + 1 from the list.